WordPress is the “So far, So Good” blogging platform available for the serious Internet Marketers. Yeah, I’m saying it again and again. Yes, there are many other alternatives to WordPress, but many people tends to use WordPress. Moreover, many internet marketers who used to play with other blogging platforms later changed their decision.
And they moved their business from those platforms to the great WordPress platform.
Another half, struggles to find a way to establish their online business using WordPress. But they still don’t know how to install WordPress. Sometimes these people worry so much of being lost in the tech world. People who have used WordPress know how it feels
And people who haven’t, don’t know how it feels.
That fear of dealing with things they called “so techie” leads them to no business at all, even they have great plans to start, launch and marketing. So if you have been one of them in the past, I’d like to fish you from that group of people in the next few minutes.
Get ready for the fastest WordPress installation!
How to Install WordPress Manually
When I was on Blogspot platform in my early blogging career, I thought moving my blog from Blogspot platform to WordPress self-hosted version is so complicated.
But, It wasn’t what I thought!
First reason you don’t not want to deal with WordPress may be, this mind complication. You think it is complicated even it isn’t and even you never tried it. Now you’ll see how simple it is to install your WordPress website in less than what they called famous 5-minute installation.
Yep! If you’re ready with the goods, you can complete this in under 3 minutes. Save that extra 2 minute for a quick relaxation. 😉
Install WordPress Using Server cPanel
This is the fastest manual method of installing WordPress for me. I know it is same for you too. Okay let’s start the race. Tick the clock!
Things you need:
❶ cPanel login details
Once you purchased a hosting service like HostGator which gives you the great chance of using cPanel, you’ll receive the cPanel login details in a matter of seconds. This email contains all the important details that you should know as the owner of the hosting account.
Also, they supply you the default URL for the cPanel access. However, you can use these simple methods. For a moment suppose your website URL is “www.example.com”
➠ Add the word “cPanel” after your website URL. www.example.com/cpanel (Note the forward slash)
➠ Add the cPanel Port after your website URL. www.example.com:2083 (Note the colon)
If you are using another hosting provider other than HostGator, then above 2 methods will slightly different. Interesting fact is all the hosts which I’ve worked with my clients are supporting above methods.
❷ Correctly setup domain name
Yeah, I mean correctly setup nameservers of the domain. There are chances which you bought the hosting at one place and the domain at another place. One company may provide all the trades, but they might not be the best.
So, if you are in this situation don’t worry. Nameserver setup is just a 30 second job. Yeah, It’s that simple. In my case, I purchase all my domains through Namecheap and hosting through Hostgator. So I also had to forward my domain nameservers from Namecheap to my hosting account nameservers.
I said, you get all the important details of your hosting account in the 1st email they sent you. So open it and check for the Nameservers. In most times, they mention 2 Nameservers for your Shared hosting account. Now copy those 2 Nameservers. Make sure you do remove “http://” once you pasted in the notepad.
Okay, it’s time to login your domain account. Now go to your domain settings and find the Domain Nameservers page and paste the 2 Nameservers that you pasted into the notepad in this page. Depending on your Domain registrar, you need to find the accurate page.
If it is Namecheap you’ve got, here’s a quick screenshot from my Namecheap account.
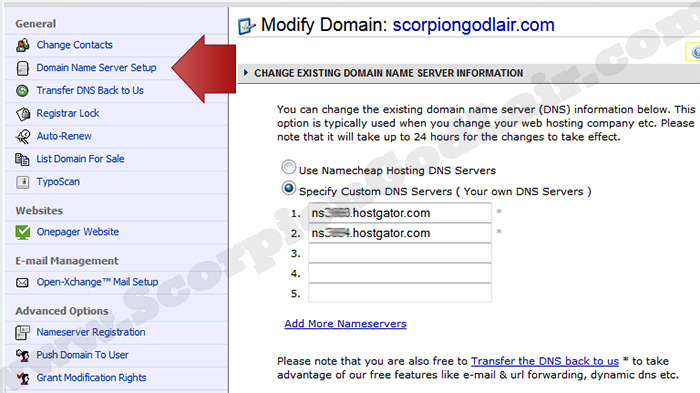
Go to the arrowed page and you’ll be here.
Ready, Steady, Go!!!
I guess you’ve found everything and ready to go for the 3 minute WordPress installation. Follow the exact steps below and make sure to post a comment if you’ve any questions. From here, I think you already transferred the domain nameservers correctly and your domain is linked to your hosting account.
❶ First of all, you need to login your website cPanel. So type your domain name or URL in the browser address bar. Then depending on your hosting provider add the access port or word cpanel. In my case, I can use this one to access the cpanel. – http://www.example.com:2083
Now login to your cPanel by using the login details provided in the 1st email after purchase. Things may look like below screenshot.
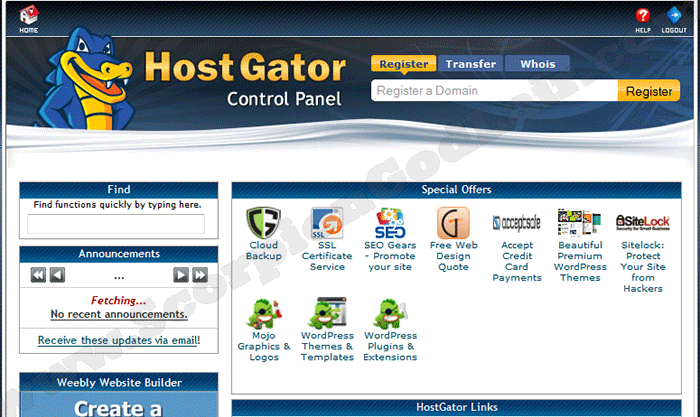
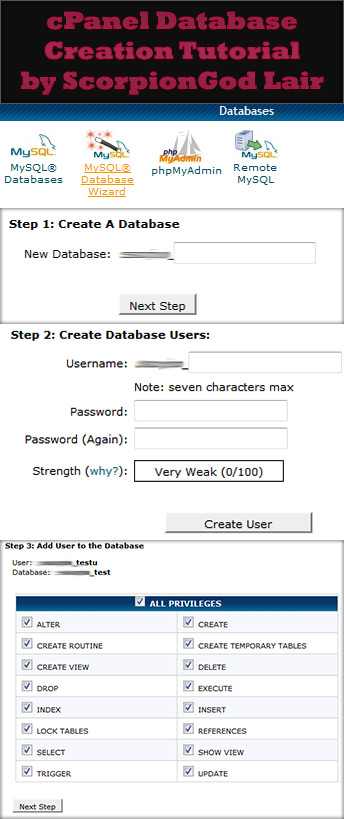 ❷ In order to install WordPress, it requires a working MySQL Database where it stores everything from posts to images in your website.
This second step is to create that MySQL database by using the MySQL Database Wizard in the cPanel.
As you can see in the screenshot right, follow the simple 4 steps to create your MySQL Database. If you’re still in the cPanel dashboard, then scroll down for the section called “Databases”.
Click on the Database Wizard to start the step by step wizard for database creation.
Step ➀ – Give a name for the Database such as ‘wpdb’
Step ➁ – Create an user account to deal with the DB such as ‘dbuser’ with a strong password.
Step ➂ – Assign all the privileges for above user to play with the DB. *VERY* IMPORTANT.
You need the details of this MySQL Database in the process of WordPress installation. Therefore, don’t forget to save these details in a notepad at least until you finish installation. DB Name, DB User & DB User Password are the details you want to save.
Many hosting providers like HostGator do host the Databases in your own server. But others do store it in another server. At this situation, you need to include the Database Hostname for that details you saved above.
❸ Once you completed the Database creation process, you need to upload the WordPress files to your server. It’s this step which save you those minutes. Did you download the latest version of WordPress? If not, you can download it on the wordpress.org
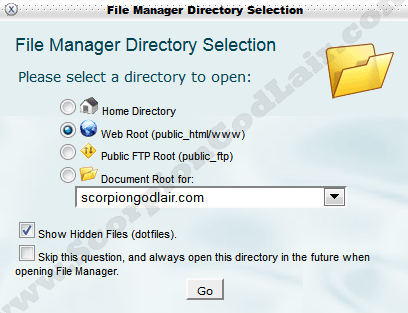
You should have the zip file of WordPress by now. You don’t need to unzip it because the cPanel can unzip or extract it after upload. In order to upload the WordPress Zip file, you need to go to “File Manager” in the cPanel under the section of “Files” section.
Choose what I selected in the screenshot and click Go. Then you’ll see the File Manager. If you haven’t uploaded anything, you will see only the default directory called “cgi-bin”. Click on the Upload button in the top navigation bar and select the WordPress zip file to upload.
Once the upload is completed. Go back to the File Manager and click on the Reload icon in the small navigation bar. You’ll see the WordPress Zip file there. Right click on it, then click on Extract. Done? you’ll see the extracted files of WordPress.
Now you can remove the WordPress zip file since it is no longer required for your site.
Final step in the File Manager is to rename the wp-config-sample.php to wp-config.php after adding the accurate Database details which you saved in the 2nd step. Oh! I forgot to mention, you can right click on this file and Click on Code Edit to edit it in the browser.
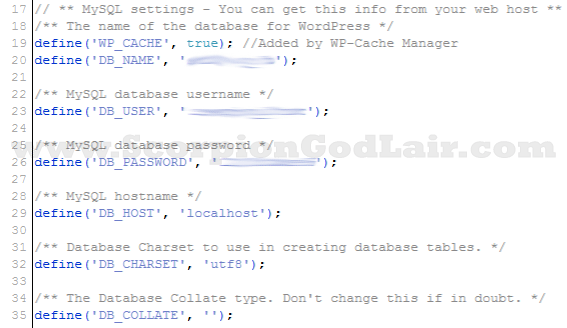
Make sure to change the DB Hostname from “localhost” to your one, if your host store the Databases on another server.
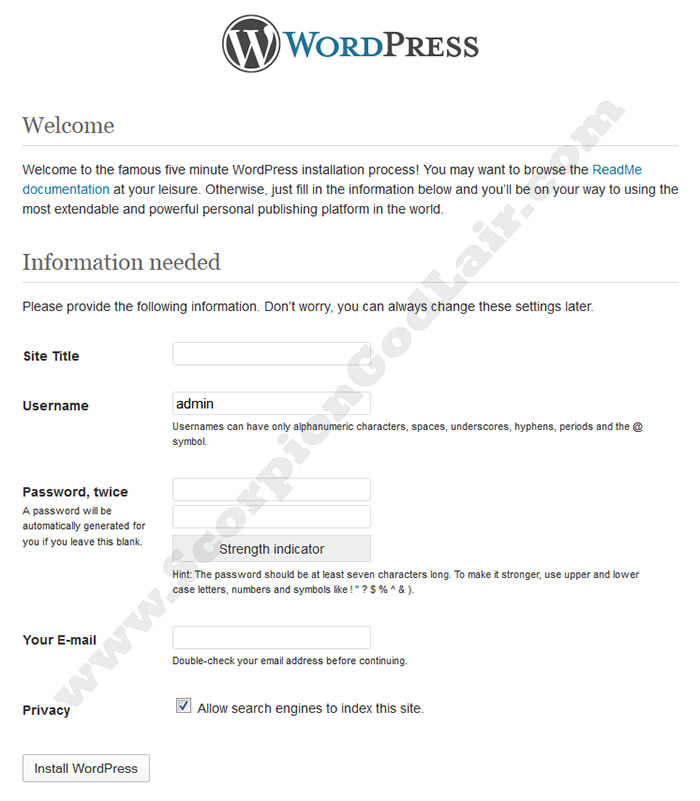
❹ After everything above, it’s the fun time with user-friendly installation. Now you can go to your website by typing the URL in the address bar. If that doesn’t bring you to the above page and mention “Error establishing database connection”
Then your Database details may be wrong or it could be your hostname is wrong. Also it could be a mistake done by you in the process of Database creation in the step 2.
If everything okay and it still doesn’t show you above page after trying with www.yourdomain.com
Then this one will do the trick. – http://www.yourdomain.com/wp-admin/install.php
Now fill the details as you wish and you can login to your WordPress website in the next minute. This is how you need to install WordPress using cPanel method. So what you think? Is this the fastest manual installation method ever?
Install WordPress Using FTP
If your hosting provider doesn’t support for cPanel, File Manager or Zip file extraction. Probably, you cannot go with the fastest manual method. But this one can help you to install WordPress again manually.
When you use FTP Installation method, you are going to spend more time than you would spend with cPanel method. The process is still same with the Database Creation.
But the difference is you need to use FTP client such as FileZilla to do FTP installation. You can download the FileZilla here and it’s free!
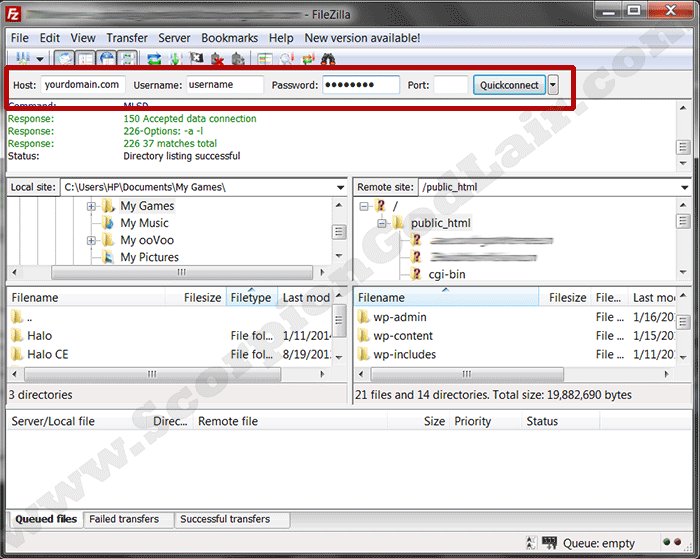
In the above screenshot, notice the area covered with the Red lines. You need to enter the FTP login details for your Hosting account in this area. If you’re using HostGator, then you can use the same login details which you used for cPanel access.
But, some hosts doesn’t provide this feature. If this is the case, you need to find the FTP login details from the after purchase email or by logging to your hosting account. When you do have the stuffs, just enter as shown in the screenshot and click Quick Connect.
Then you can see the files in *your* computer in the left side and the files in your *server* in the right side. Before you upload, unzip the WordPress zip file and go to that unzipped WordPress folder from FileZilla. Now select all the files of this folder by clicking the “Ctrl + A”.
Right click and select “Upload”. Once the files has been uploaded successfully, you need to edit the wp-config-sample.php file as I explained in the cPanel method. This time right click on the file and click on Edit.
Once done follow the same steps mentioned in the Step 4 of cPanel WordPress Installation method.
How to Install WordPress Automatically
Personally, I don’t recommend anything that happens automatically. But you may want to free your head from the headaches if above processes looks too difficult to achieve. So here is the easiest method that installs WordPress with couple of clicks.
When used this method, you don’t have to upload, create databases or deal with FTP clients. Automatic installation can be completed by filling few fields, but you have to aware how to fill these.
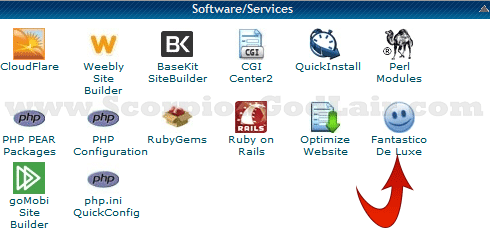
You are going to use the cPanel software called Fantastico De Luxe for this automatic installation of WordPress. Find the Fantastico De Luxe software at the place shown in the screenshot and click on it.
Now choose the WordPress under “Blogs” in the left sidebar and click on “New Installation”. This will proceed the installation form where you type the Usernames, Password, Emails and the Domain name. Once you completed this form, there’s nothing to do much.
The next step is to proceed the installation and you’ll be given the Login details which you typed earlier with the Login URL. Simply login and start your journey to become the next internet marketer.
You can’t be a successful internet marketer by having just only a WordPress site, you have to learn what works and what not. So, what’s your favorite method of installing WordPress? Is there a specific reason for choosing that method? If so, I’d like to hear it from your words!
HINT: Comments are opened for you! Sharing buttons are waiting for you!
Leave a Reply